FAQs
Profile
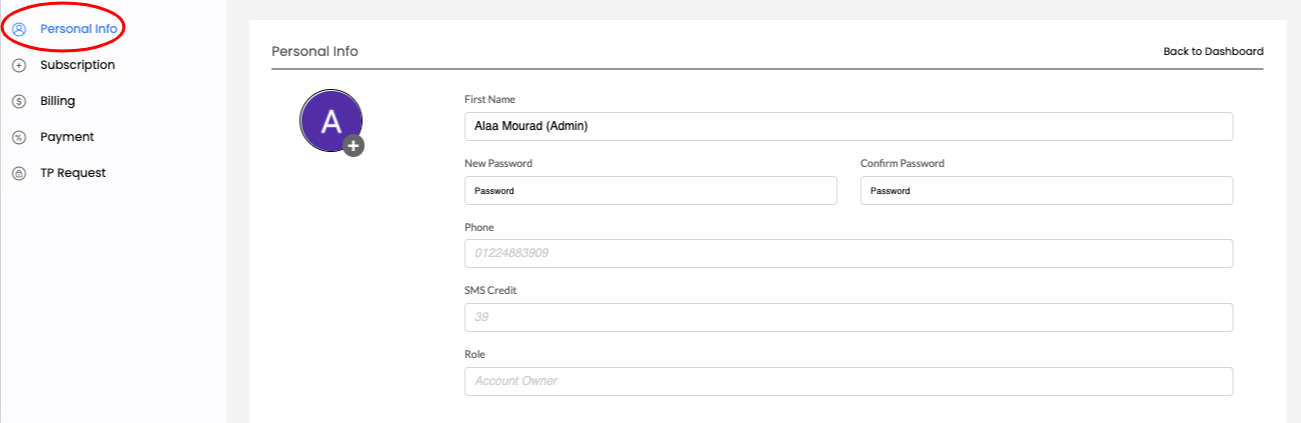
How to change profile name, mobile number, and picture?
1. Go to Account
2. Open Personal Information
3. Edit name, mobile number, and account picture
4. Click Update
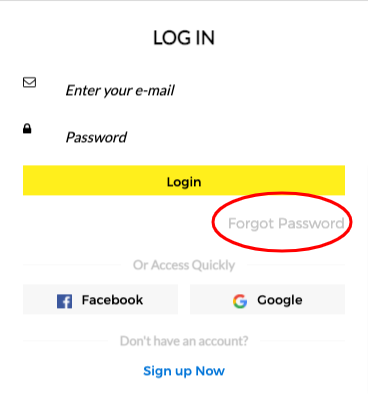
How to change password?

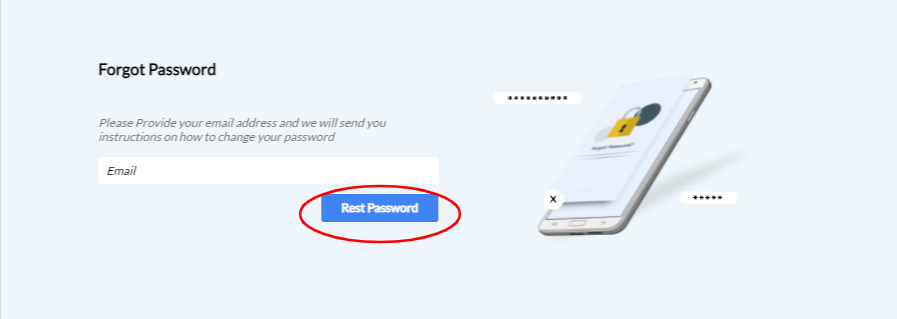
How to reset password?
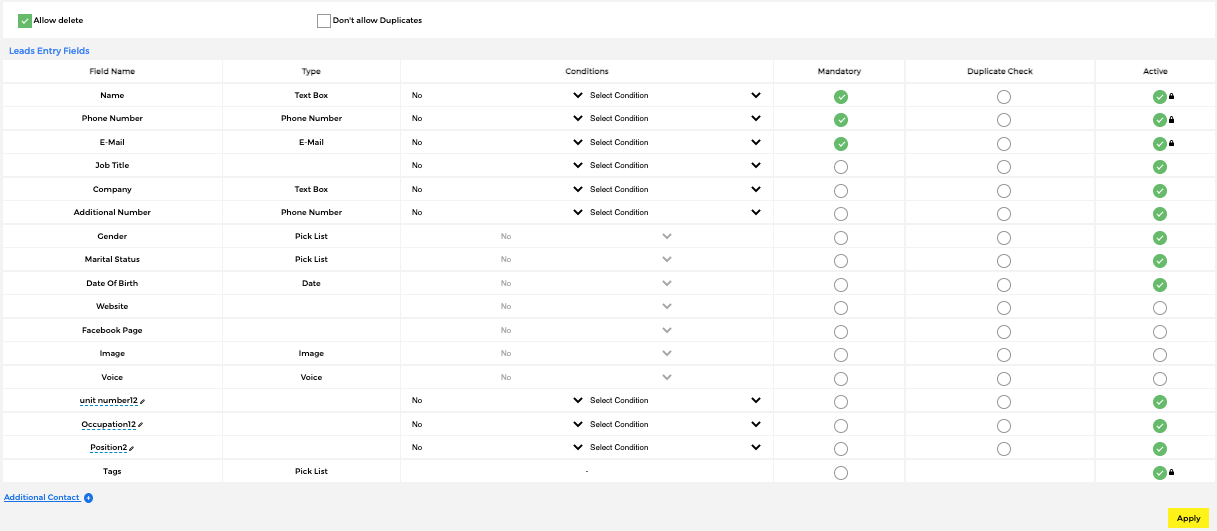
How to customize lead attributes entry fields?
1. Go to Configurations > Leads Attributes
2. Select/Remove the leads entry fields you want
3. Click Apply
What are duplicates? How to manage duplicates?
Duplicates are contacts that are added to the system twice with two different persons in charge.
1. Go to Duplicates
2. Check for duplicates
3. Open duplicated leads
4. Click Solve
5. Assign, move or delete.

What happens if I turn off duplicates? Will it delete duplicates on
the system? But what about existing contacts? So will they remain on
the system?
Nothing will happen to your existing duplicates. If duplicates are off, you won't be allowed to add the same phone number twice even if under different names.
How can I add/remove a stage to my pipeline? How can I customize my
pipeline stages?
1. Go to Configurations > Leads Status & Source
2. Add/Remove/Rename/Rearrange pipeline name and stages.
3. Click Update

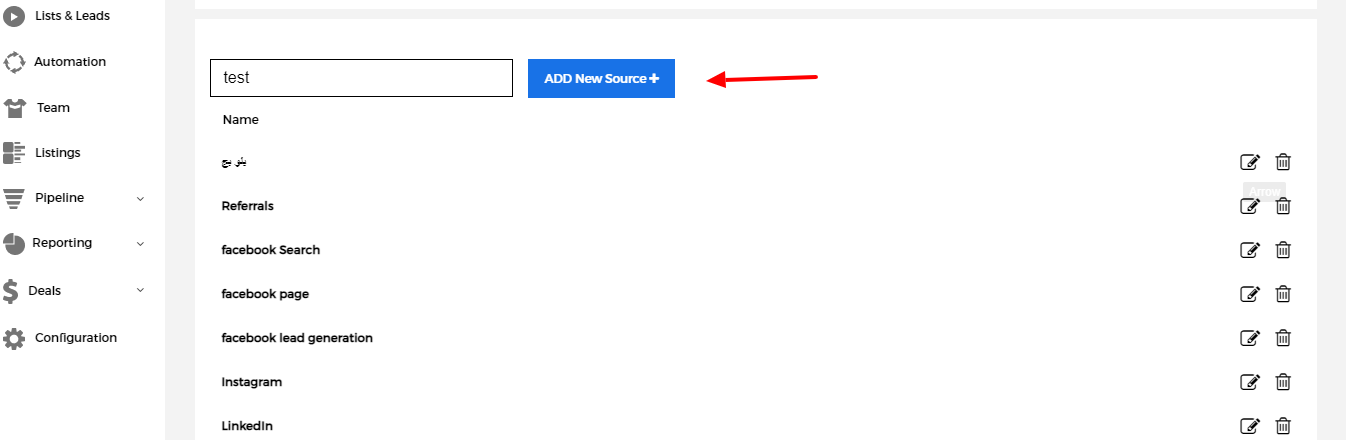
How to customize lead sources? How to rename sources? How to delete
sources?
1. Go to Configurations > Leads Status & Source
2. Enter source > Click add new source
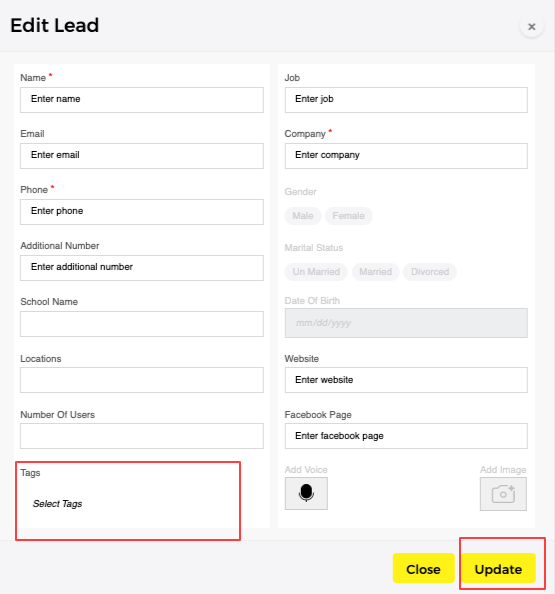
What are Tags? How to add tags to leads?
Tags are labels that you assign to a lead to identify a specific situation like "new client" "VIP client" "budget" etc...those tags are preset and defined by the admin. Tags are searchable and can be easily assigned to leads.
To add tags to Leads:
1. Go to Lists & Leads > choose list
2. Go to Lead > Edit
How to define tags?
1. Go to Configurations > Leads Status & Source
2. Enter tag manually or Upload Excel

How to add leads via Facebook leads form?
1. Go to Lists & Leads > choose list
2. Click on Connect Facebook Leads

3. Approve permissions on Facebook
4. Choose profile
5. Choose the form

6. Fill out mapping
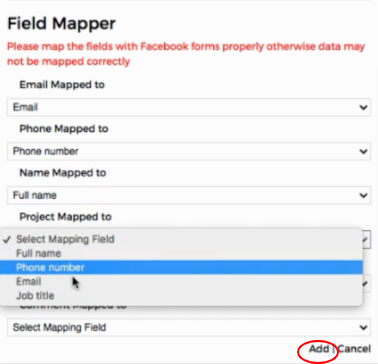
7. Update
How to remove facebook Lead form connections?
1. Configurations > Facebook connections
2. Click delete

What is a CIL?
Contact Information Letter: linking the lead’s contact info (with the developer of choice) to the Sales in charge of the lead.
How to create CIL?
1. Go to Configurations
2. CIL Settings
3. Add New CIL
4. Fill developer/project information
5. Fill E-mail information
6. Click Update
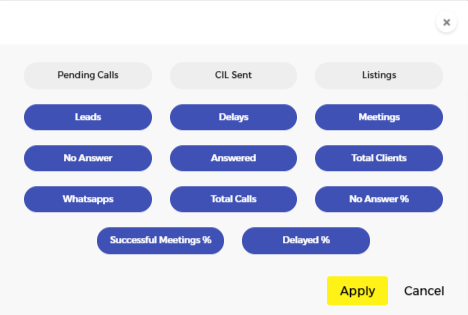
How do I choose what to add to my company’s products/services
fields?
1. Go to Configurations > Products & Services attributes
2. Select fields you want > Active

3. Click Apply
How to add a new product?
1. Go to Sales > Products & Services
2. Add new product
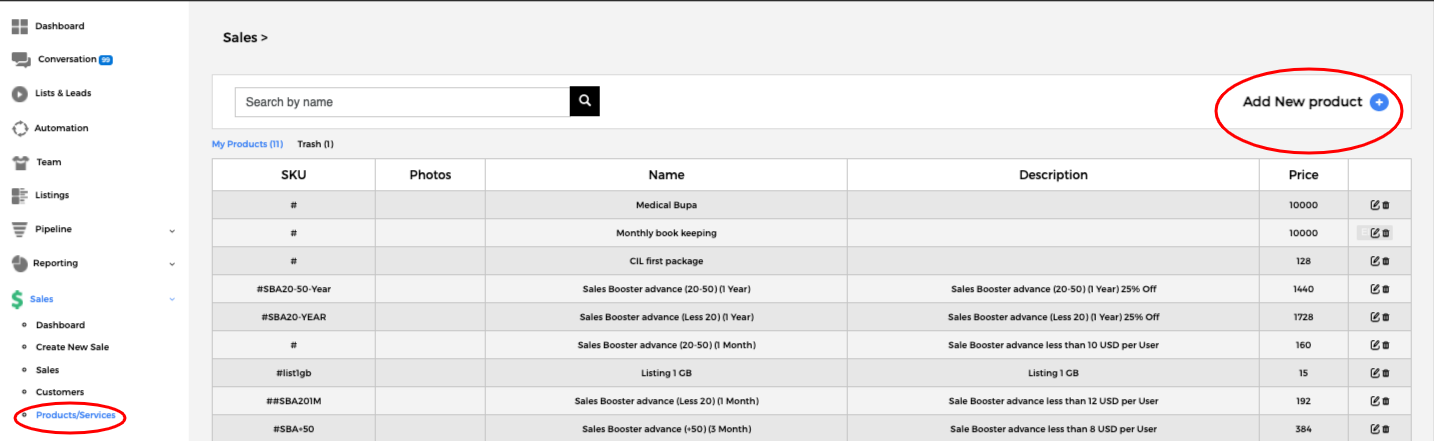
3. Fill popup
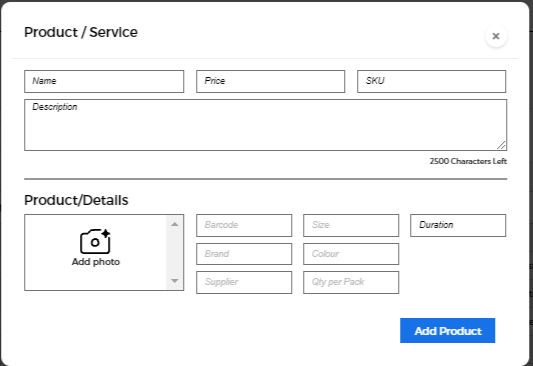
4.Add product
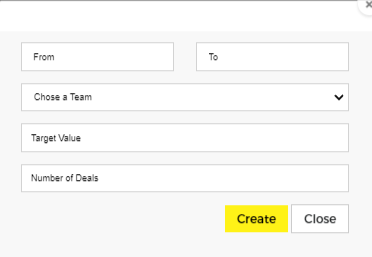
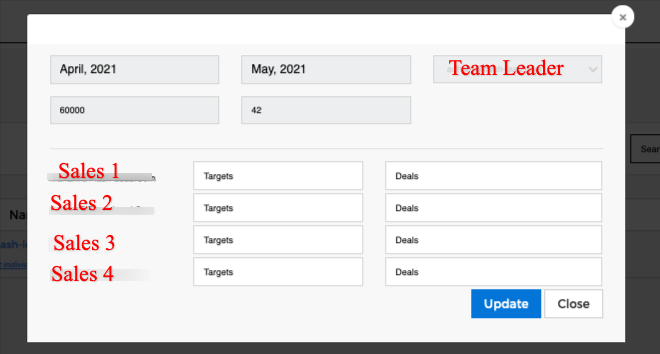
How to set up team targets in Sales configuration?
1. Go to configuration > Targets set up
2. Set Target
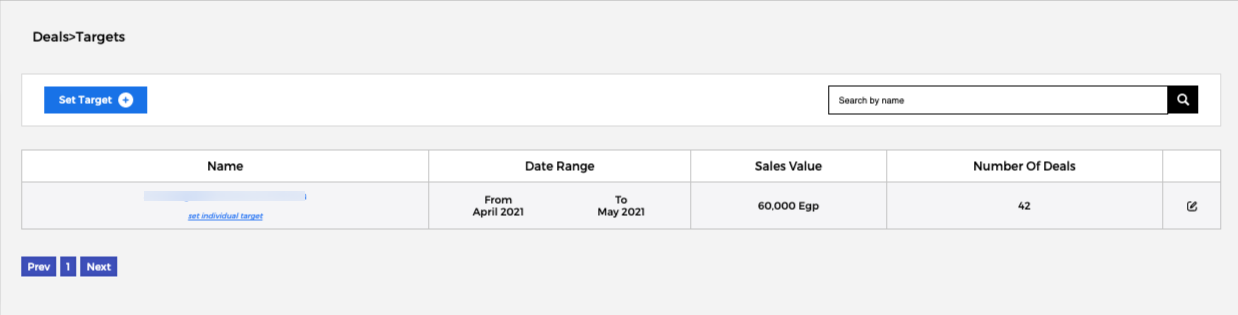
3. Fill pop up
4. Create
How to set individual targets for team members?
1. Go to configuration
2. Press Targets set up
3. Press Set Individual Target
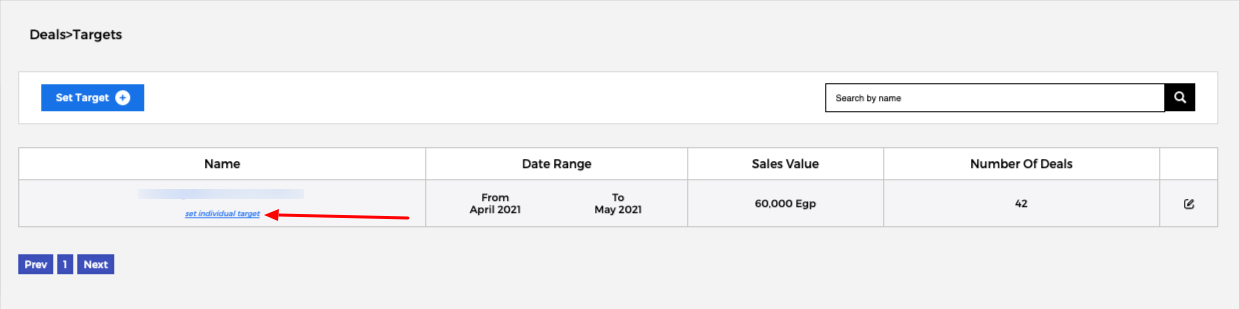
4. Fill pop up
How to set up Flash Lead Call?
FL Call is set up from our side.
Client-side requirements:
1. A Unified phone number that will forward all calls to our server
2. Team members phone numbers who will receive the calls
3. IVR (voice message)
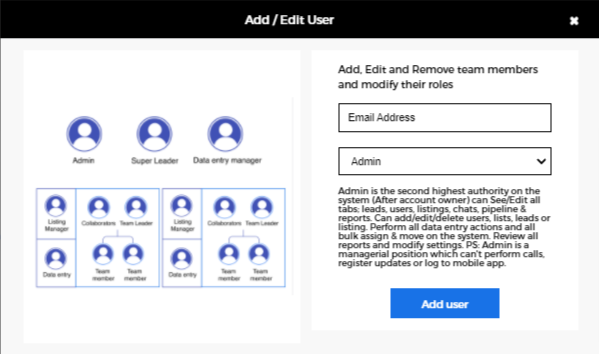
Defining Roles
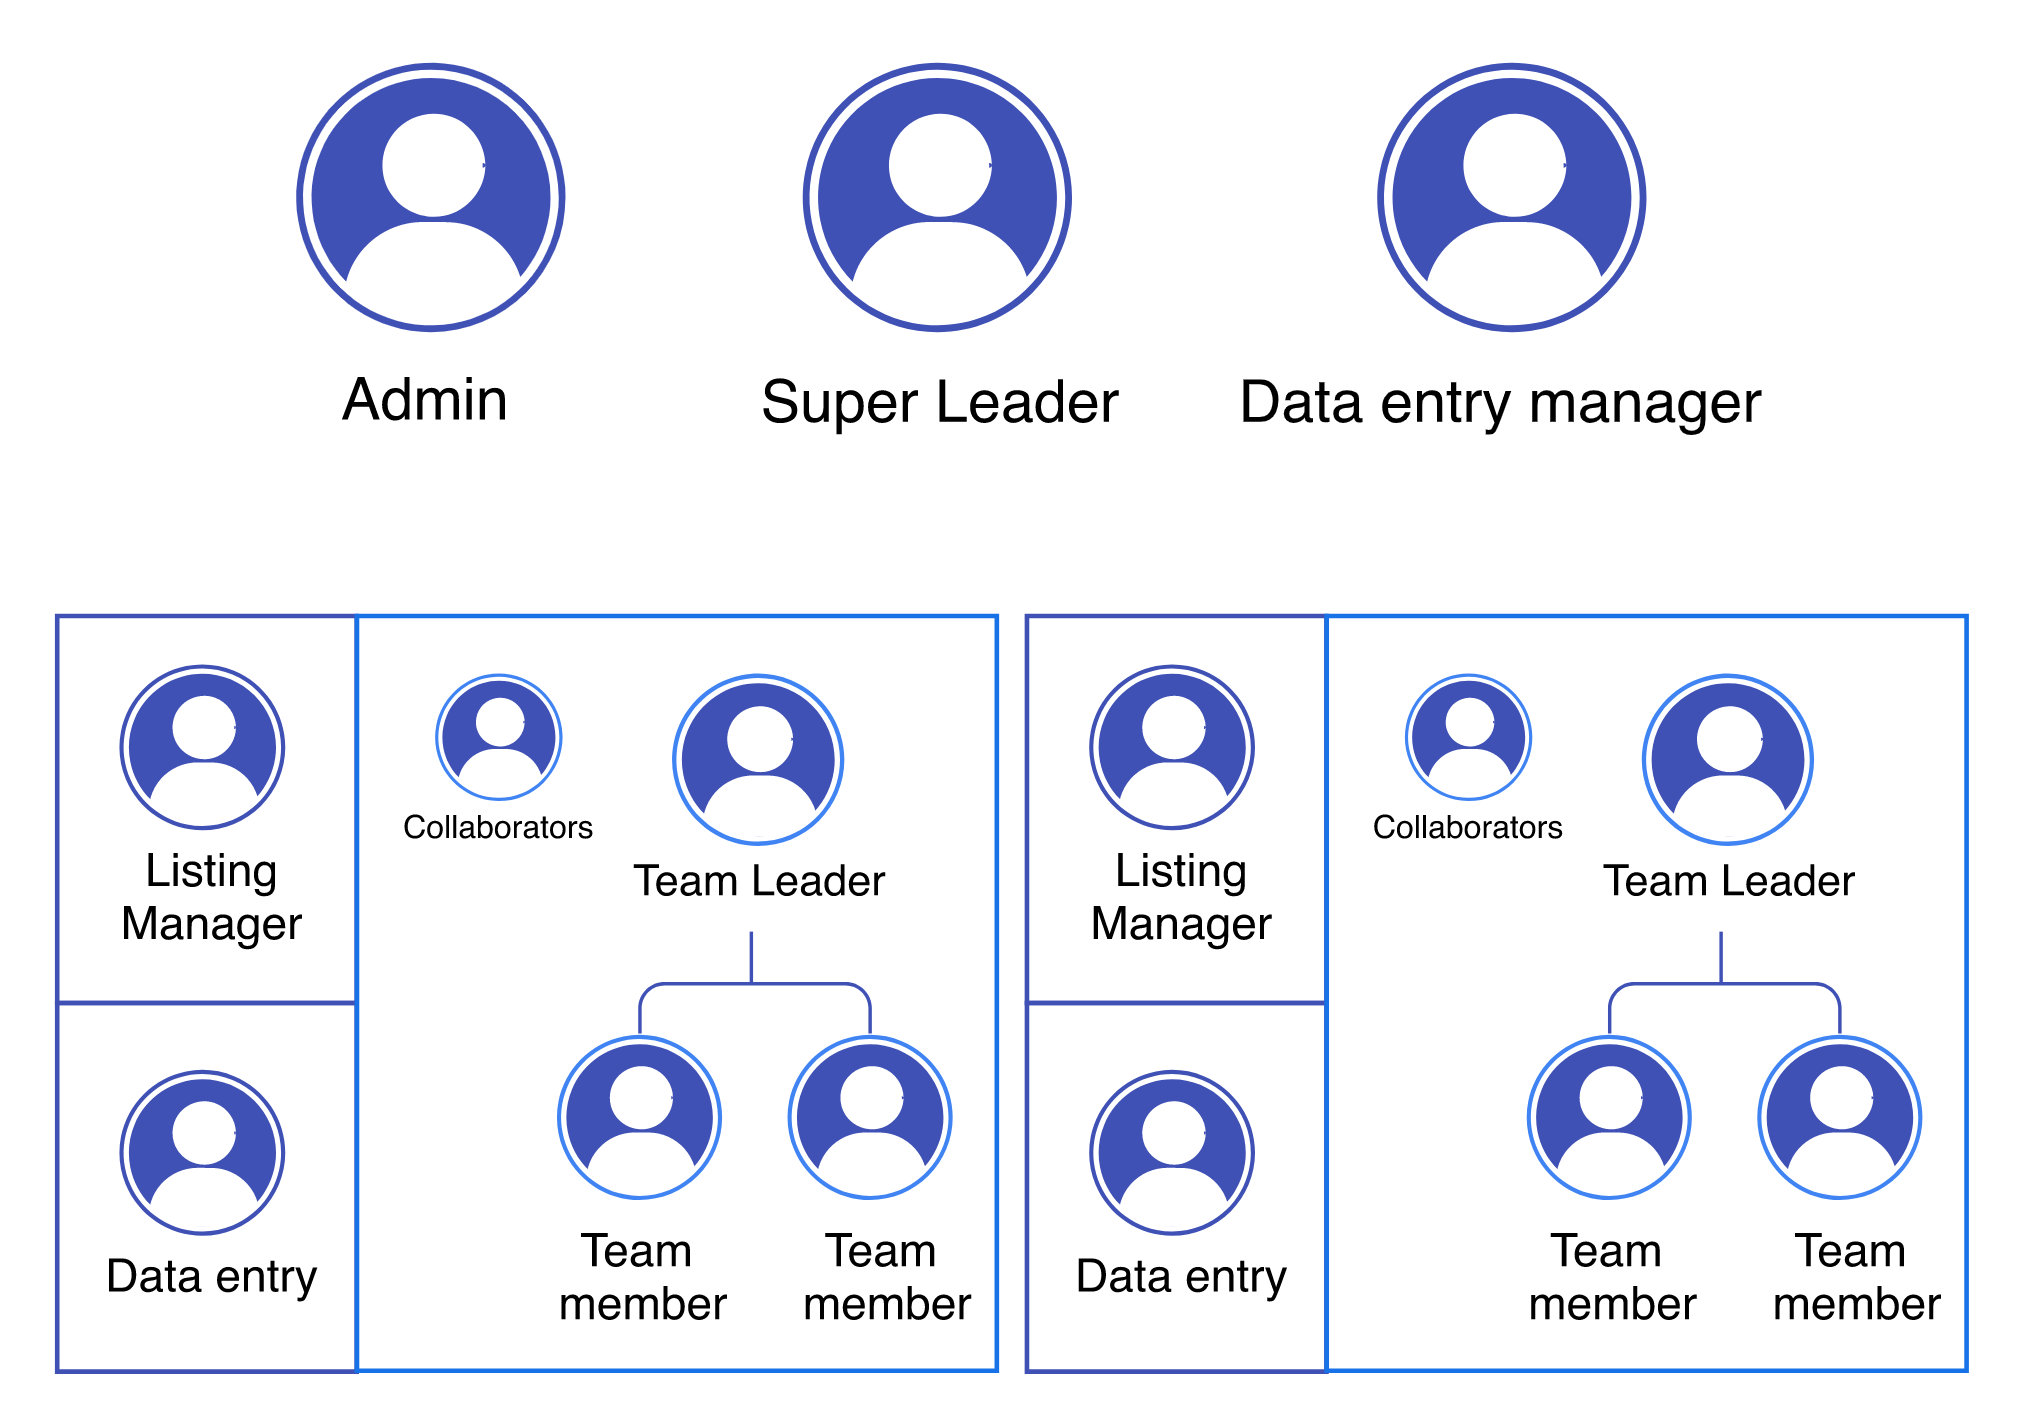
-Account owner is the highest authority on the system. They can edit all tabs, leads, users, pipelines, and configurations. They can perform all data entry actions & review and modify reports & settings .Can perform all functions including performing calls, register updates, or log to mobile apps.
-Admin is the second-highest authority on the system (after Account Owner). They can see/edit all tabs; leads, users, listings, chats, pipeline & reports. Perform all data entry actions and all bulk assign & move on the system. Review all reports and modify settings. PS: Admin is a managerial position that can't perform calls, register updates, or log to mobile apps.
-Listing Manager is a position made for the person who exclusively handles listings, he can add, edit any listing on the system. Visibility: only see "Leads" inserted or assigned to him.
-Super Leader is the highest position in terms of Sales, they can see any list on the system without being part of it, monitor all team leaders and teams, perform all actions on any lead on the system (register a call, move, re-assign). Review all reports, pipelines & dashboards. Can log to a mobile application.
-Collaborator is a sales position with limited access on the full account but full access on the list they are part of. They can see leads, reports, assign, move and Can log to a mobile application (for the lists they are part of.
-Team Leader is a middle sales position, they can be responsible for a team. Can overlook leads assigned to them and to his team, perform all actions on any lead they can access (register a call, move, re-assign). Team leaders can see only the "Lists" they are part of, can see only their leads and team's leads. Can log to a mobile application.
-Team member is an entry sales position, Can overlook leads assigned to them only, perform all actions on any lead he can access (Register a call, move, re-assign). Team members can see only the "Lists" they are part of, and Can't be added to a list without their "Team Leader". Can log to the mobile application.
-Data entry manager is a high position that can be used by "marketers" or the person in charge of "data entry", he can see any lead on the system. Perform all data entry actions, bulk assign & move on the system. Can't create new lists, add users or see reports.
-Data entry is a role with limited accessibility, they can see all lists but only see the leads inserted by them in each list, can do bulk assign and move to the leads inserted by them to any user. Can't perform calls, connect campaigns or see reports. This position can be used for "data entry" people or marketers at the entry level.
How to add users & assign roles?
1. Go to Team
2. Add users

3. Fill pop up
4. Add user
How to edit/change roles?
1. Go to Team
2. Edit desired user

3. Change role from dropdown
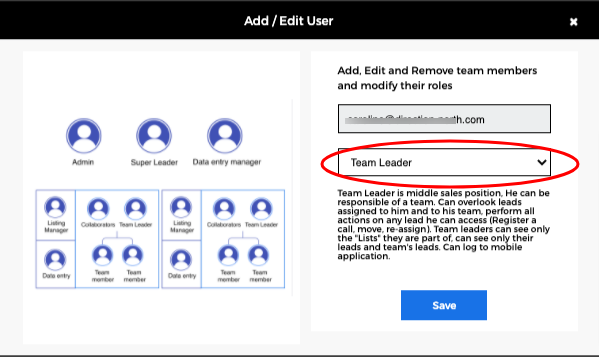
4. Save
What happens to leads when I delete Team Leader(s)?
In order to delete a team leader, you have to first assign all his leads to other users.
How to delete Team Members? What happens to their data? How to
re-assign leads?
To delete a team member you must first assign their Leads to other team members to be in charge of them, because if you just delete a member their leads will automatically be unassigned.
1. Re-assign team member’s leads
2. Go to Team
3. Choose desired Member
4. Press Delete
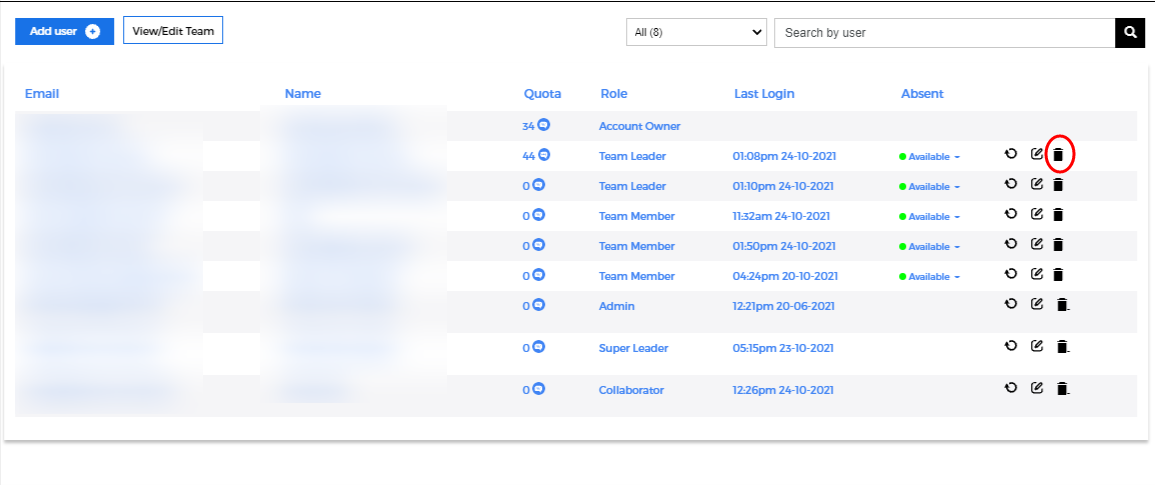
How to change passwords for users?
1. Go to Team
2. Choose desired user
3. Reset Password

4. Enter new password > Press Reset Password

5. Click Reset
What are the available methods to add leads?
Manually, upload excel sheet, facebook campaign lead forms and google forms from client websites.
How to add Leads to the system manually? How to upload leads from
excel? How to add leads from facebook lead form?
1. Go to Lists & leads
2. Choose a list
3. Choose your preferred option(add more people, connect Facebook Leads, add leads, upload excel sheet)

What are the available lead delivery types?
When you create the container, you choose one of those delivery types:
- Team Rotation
- Team leaders only
- Sales team members
- Manual assign
How to sync my call logs with Flash Lead?
The first time you open the Flash Lead application you press allow to sync Call Logs.
Later on, you can allow/remove this permission in mobile settings.
How to assign leads manually?
1. Go to Lists & Leads
2. Select desired List
3. Select desired Lead
4. Press More Actions

5. Choose Assigned to name from drop-down list
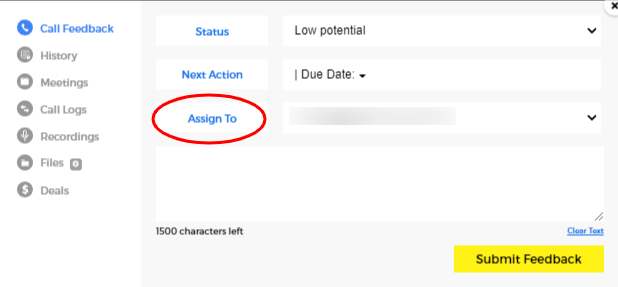
6. Press Submit Feedback
How to Export Leads from Lists?
1. Go to Lists & Leads
2. Open List
3. Export

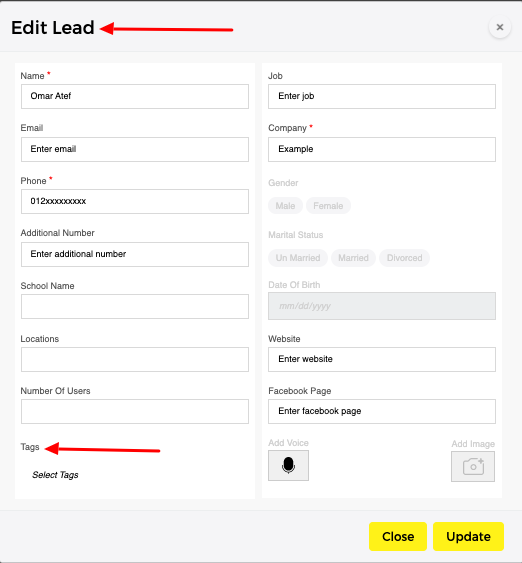
How to edit leads? How to add tags to leads?


How to move Leads from one List to another List?
1. Go to Lists & Leads
2. Select Desired List
3. Select Lead

4. Bulk Action
5. Move

6. Select List
7. Press Update
Who can export leads?
Only account owner and admins.
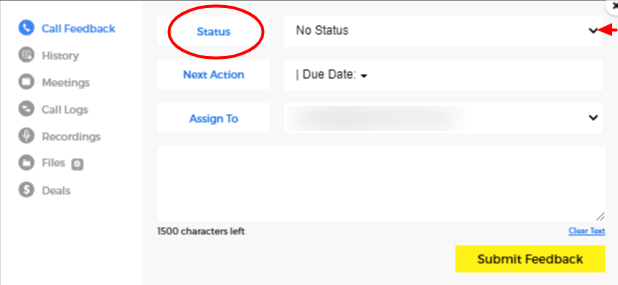
How to log an answered call? How to change the status of each Lead?
How to add tags to leads?
1. Go to Lists & Leads
2. Choose List
3. Select Lead
4. Call Answered / More Actions
5. Add your call feedback & comments, schedule a meeting, set a reminder for the next call.
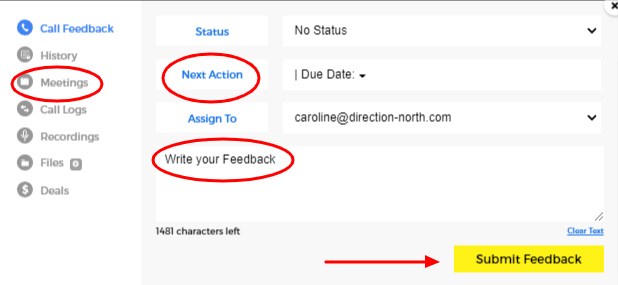
6. Submit feedback
What are the types of filters for the leads?
Creation Date, Action Date, Inactive Period, Assigned to, Scheduled, Added by, Tags, Sort by (recently added, older first, recent follow-ups ….)

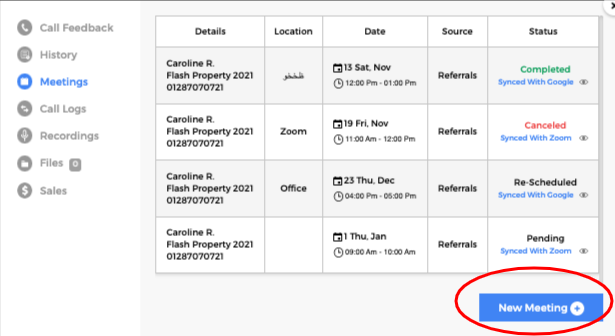
How to schedule meetings?
1. Go to Lists & Leads > Choose List
2. Choose Lead
3. More Actions > Meetings

4. Setup a new meeting > Fill meeting info
5. Add user

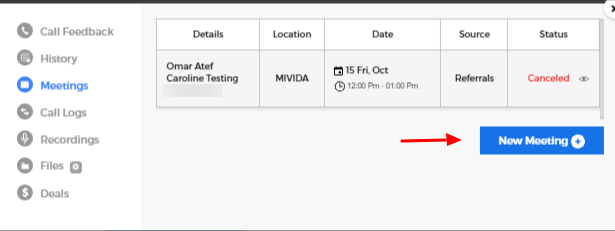
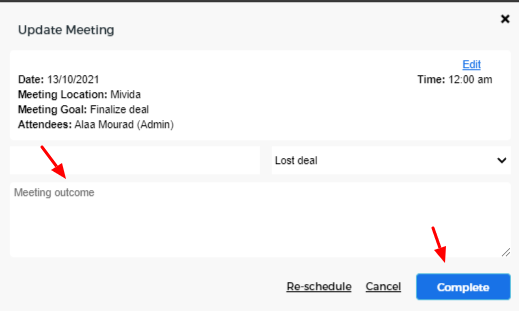
How to cancel a meeting? How to reschedule a meeting? How to update
a complete meeting?
1. Go to lists & leads
2. Choose List
3. Choose lead
4. More actions

5. Meetings
6. Press the eye icon
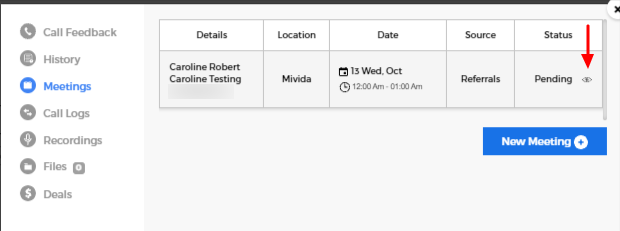
7. To edit or reschedule or cancel
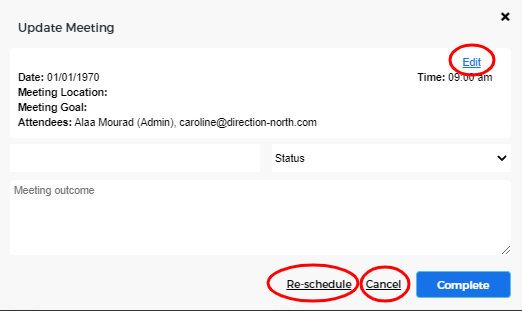
8. To update
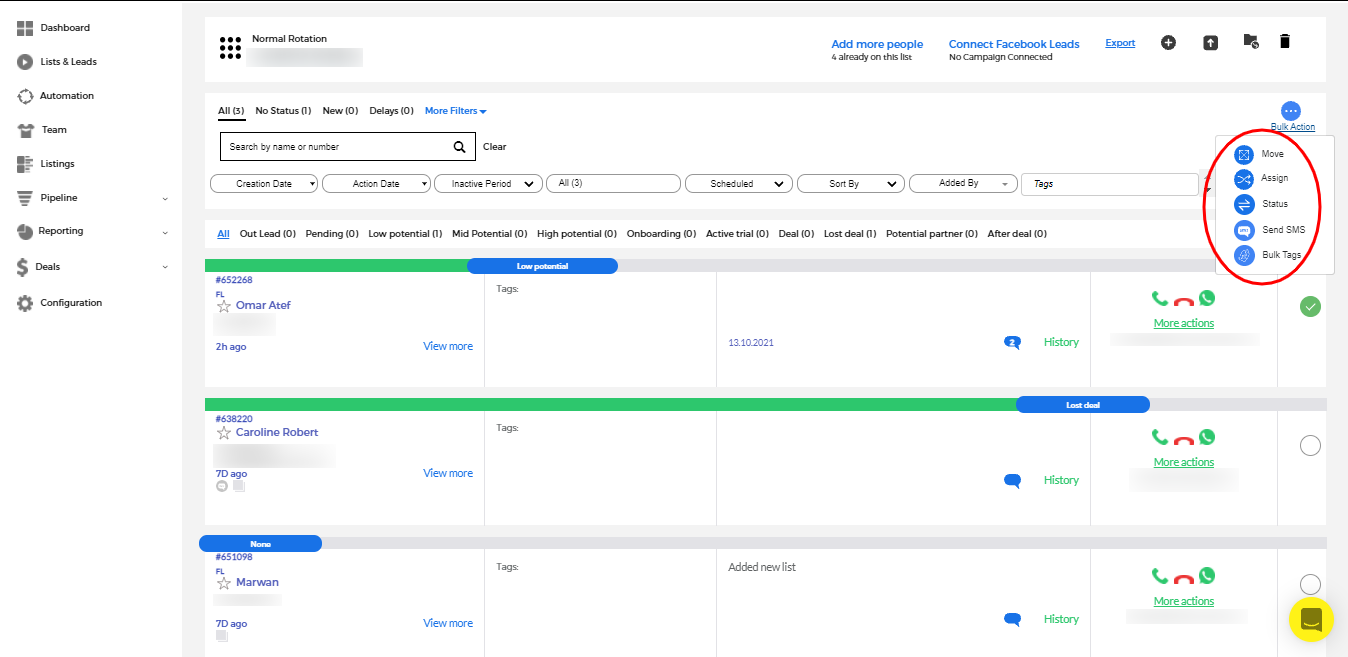
How to bulk move inside the List? How to bulk assign leads in a
list? How to change status using bulk action? How to bulk send SMS?
How to add tags in bulk? How to bulk delete?
1. Go to Leads & Lists
2. Choose List
3. Select Lead

3. Bulk Action
4. Choose the desired option ( Move, assign, change status, send SMS, Bulk Delete, Bulk Tags)
How to send an SMS Campaign?
1. Go to lists & leads
2. Choose List
3. Choose desired leads

4. Bulk Action
5. Bulk SMS
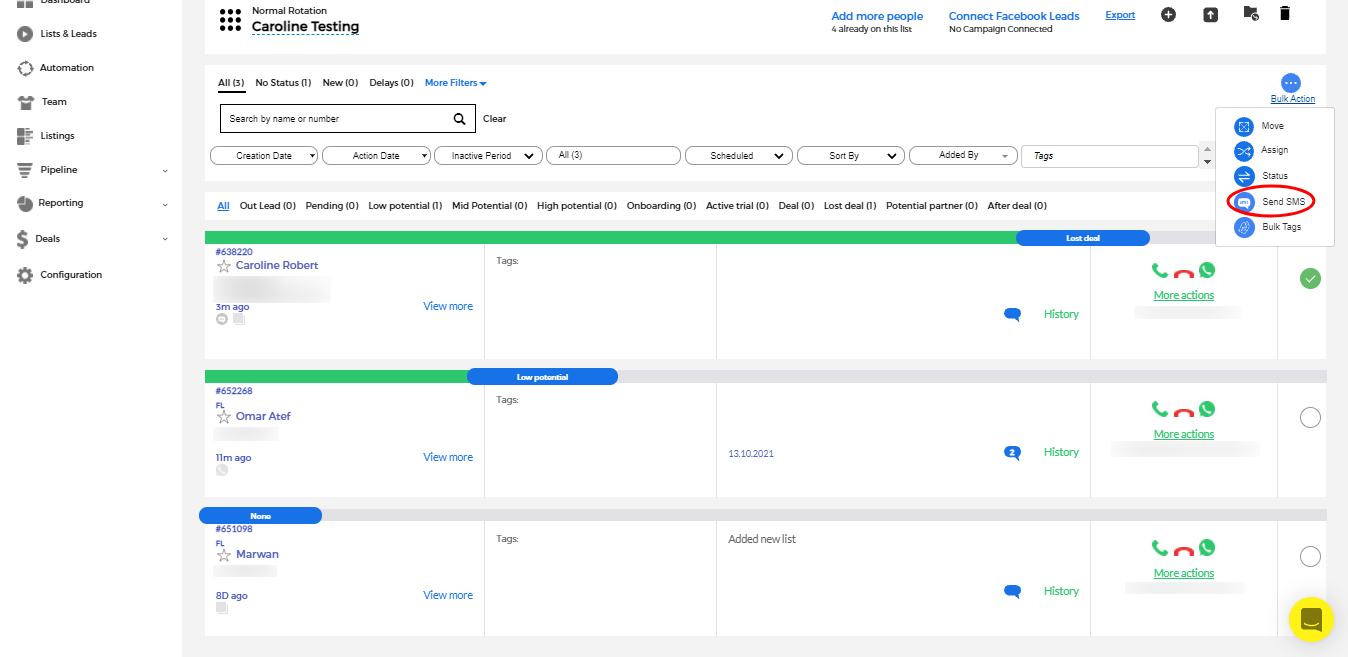
6. Write your message
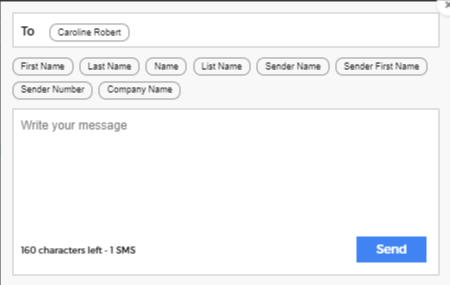
7. Send
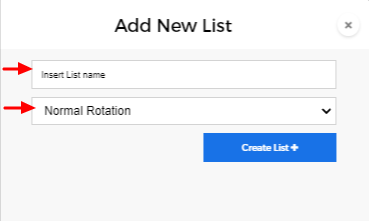
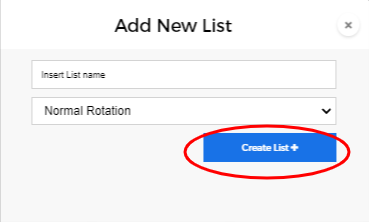
How to create new lists?

Why can’t some users see the list?
Because they’re not added to the list.
To add them to the List:
1. Go to Lists & Leads
2. Choose the desired list
3. Click on Add more people

4. Choose members
5. Press Update

How to export leads from lists?
1. Go to Lists & Leads
2. Choose the desired list
3. Choose desired Lead

4. Press Export

Lists vs groups
Lists are where you can store your leads under one name. Groups are where you can store multiple lists under one name.
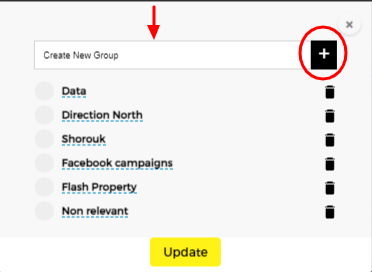
How to create a new group?
1. Go to Lists & Leads
2. Choose the desired list
3. Press Create new group

4. Name group
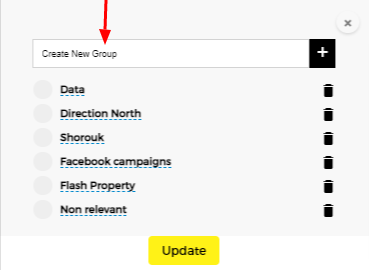
5. Press +
How to add a list in a group?
1. Go to Lists & Leads
2. Choose the desired list
3. Press Add to group

4. Choose desired group
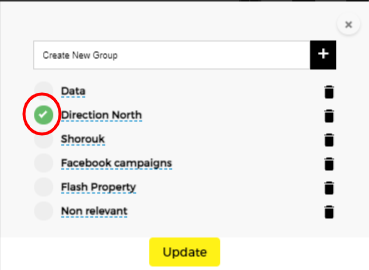
5. Press Update

How to delete a list?

How to change the status of each lead?
1. Go to Lists & Leads
2. Choose the desired list
3. Choose desired Lead

4. Press More actions

5. Change Status
6. Press Submit Feedback
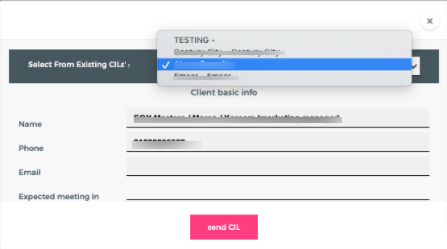
How to send CIL? How to send CIL to lead in a different list?
1. Go to Lists & Leads
2. Choose the desired list
3. Choose desired Lead
4. Click on the CIL icon

5. Choose CIL
6. Click send
Activity Progress vs. Regular Pipeline
Regular Pipeline: tracks the progress of leads inserted in certain "period of time" example: December 2021 leads.
Activity progress: tracks changes of leads status resulted by activities in a certain time, despite the lead entry date.
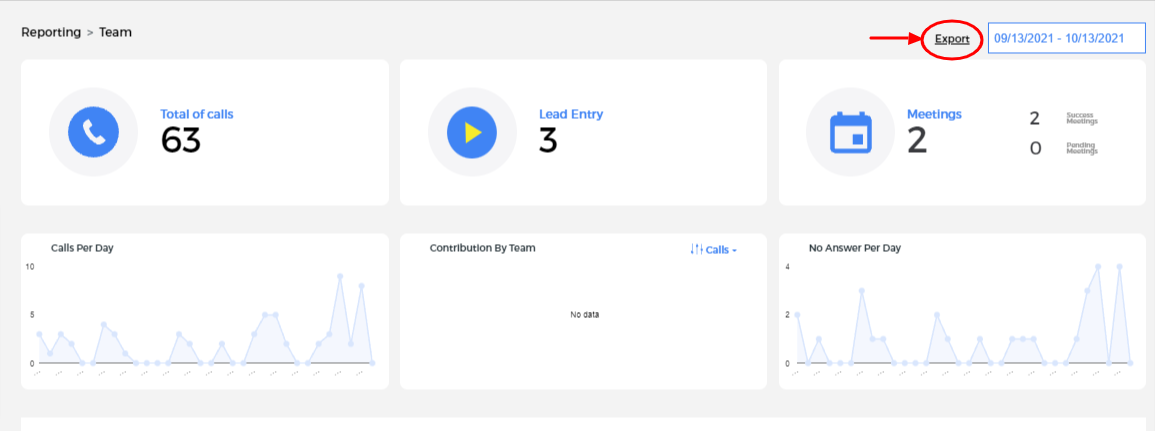
How to export a team report?
1. Go to Reporting
2. Team
3. Press Export
How to add fields in reporting?
1. Go to Reporting
2. Team
3. Press Add Field
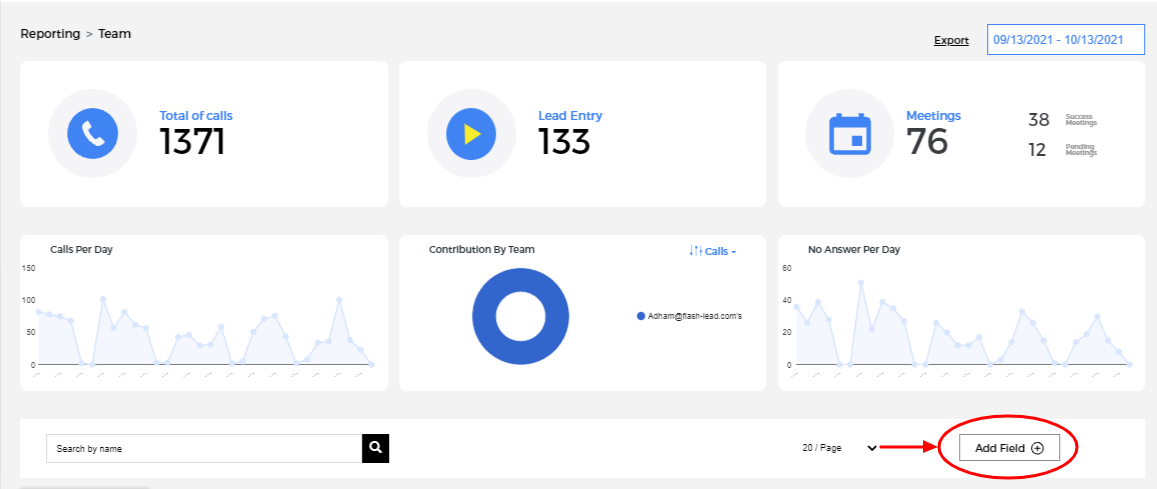
4. Choose fields
5. Press Apply
How to export logs in FLC Report?
Go to Reporting
2. Press FLC Report
3. Press Export Log

What is the sales module? What does it do?
The sales module has all the details and information you need to know about your set sales and it helps you create, organize & track your sales.
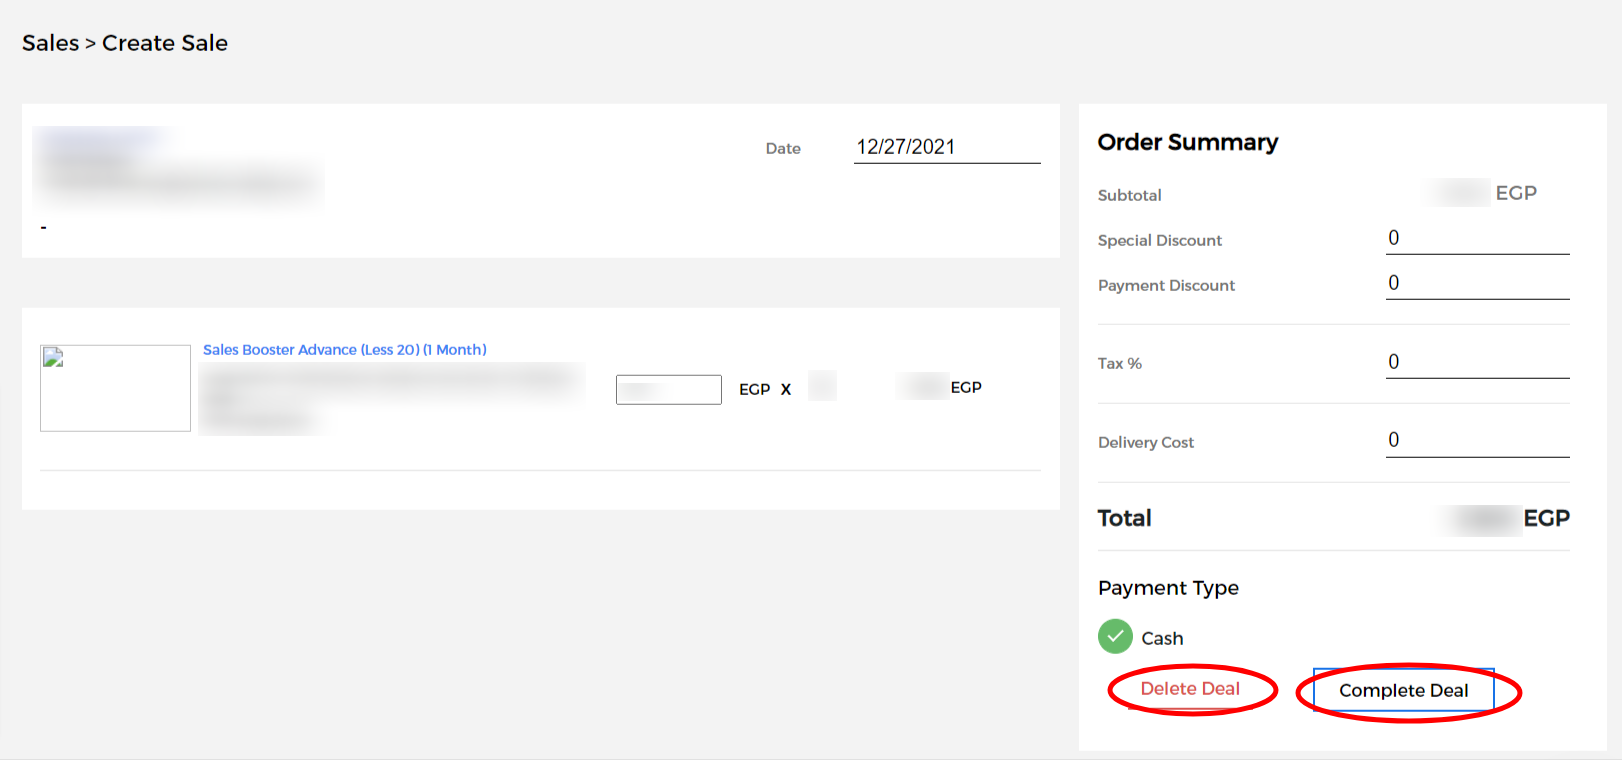
How to track Sales?
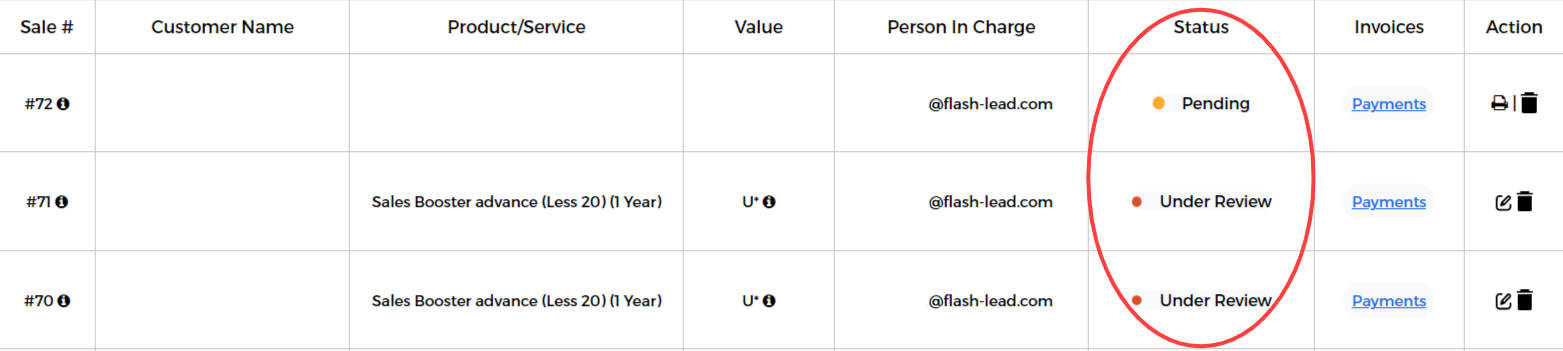


How can I complete or delete a sale?
1. Go to Sales
2. Press Sales
3. Press Edit on desired sale

4. Press Complete Deal/Delete Deal
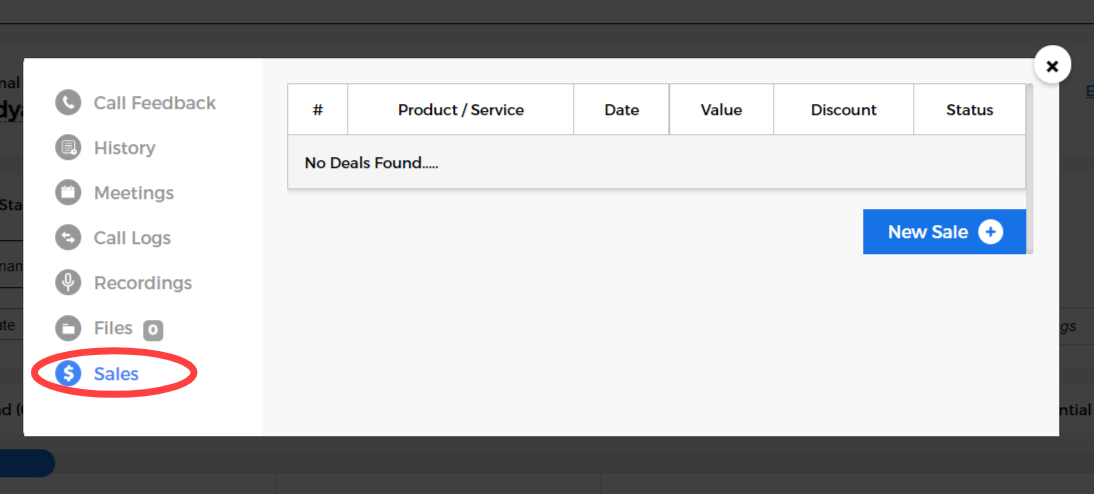
How to create a new sale?
*From Sales Module:
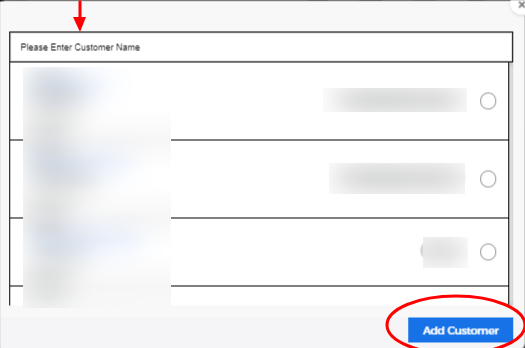
1. Go to Sales >Press Create a New Sale or Go to Dashboard > Press New Sale

2. Press Add customer

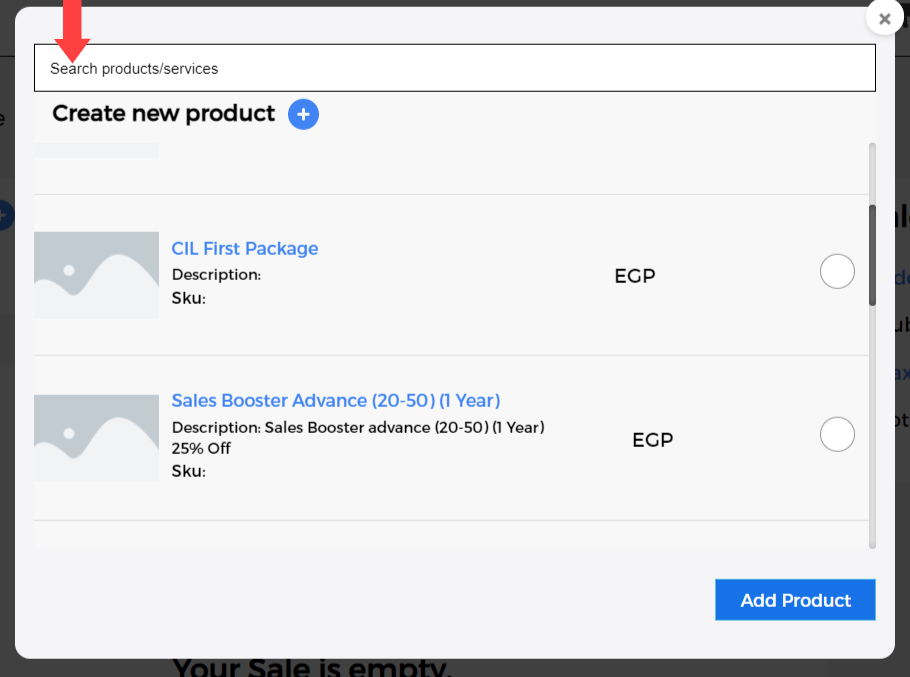
3. Press Sale details

4. Search Product / Services >Press Add Product
*From Lists & Leads:
1. Go to Leads & Lists
2. Choose desired List
3. Go to desired Lead > Press More Actions

4. Press Sales > New Sale
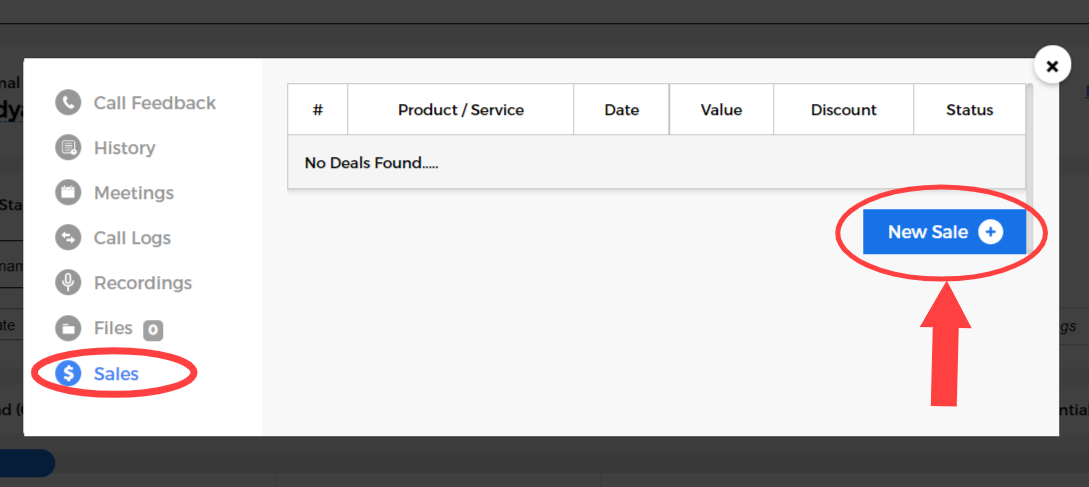
5. Press Sale Details
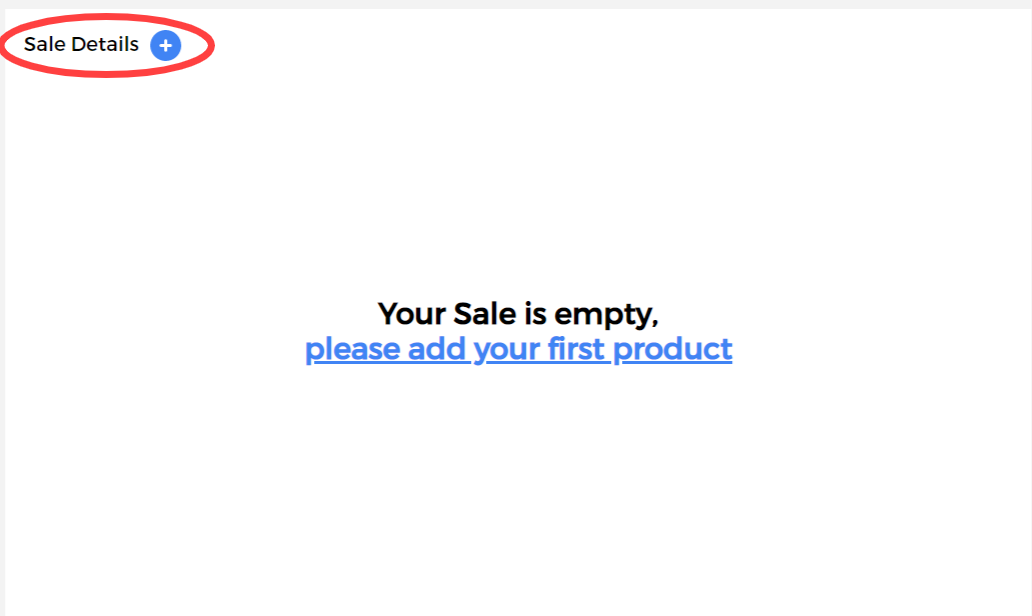
6. Search Product / Services > Press Add Product

How to subscribe?
1. Finalize contract & invoice
2. Sign-up on www.flashlead.com
3. Wait for Flash Lead approval
4. Login & start using your account
What are the payment methods?
Cash or transfer through our bank account.
What do I gain from an annual subscription?
You get 18% off.
How to renew my subscription?
1. Go to Payments
2. Add billing info
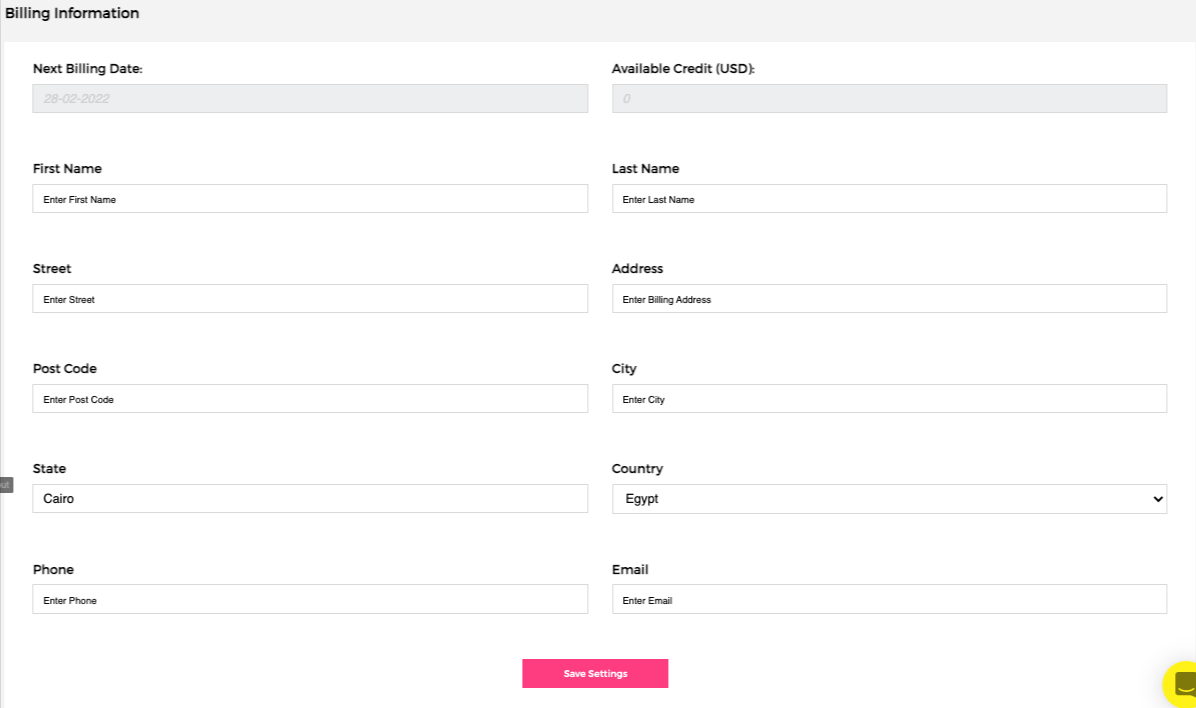
3. Save settings
4. FL Team will then generate payment request
What happens if I don't renew my subscription on time? Will I still have access to my account? What will happen to my leads and data?
There is a message that appears in the last 14 days of your subscription as a warning that the service will stop if you don’t renew on time. You will still be able to log in but won’t see any of the data on the system. Once you renew, all data will be accessible again and nothing is lost.
How to end my subscription? What happens if I end my subscription before the contract expires? What happens to my data if I end my subscription?
1. Go to backup
2. Download your data
3. For 1 year contracts there’s a 2 months penalty.
4. For Quarterly contracts, no penalty is paid.
Overview
Flash Lead for Zoom integration facilitates remote collaboration and work tracking. It saves time, double work, keeps record of all your Zoom meetings and makes sure each meeting is recorded in Flash Lead Dashboard.
With Flash Lead’s Zoom integration, you can link Zoom meetings to your leads and clients that you are managing through Flash Lead. When linked, an automated email will be sent to the meeting attendees and reflect on their calendars.
This integration helps users track meetings within Flash Lead, lead better meetings in Zoom, and saves admin time by adding the transcript and recording where you need it as soon as it’s available.
Flash Lead for Zoom is available for our PRO package.
Installation
No installation is needed from Flash Lead user’s, Flash Lead for Zoom is already installed for all PRO users
Create a meeting
When you create a meeting fill all the information in Flash Lead meeting fields
You will find a checkbox to automatically create a Zoom meeting link.
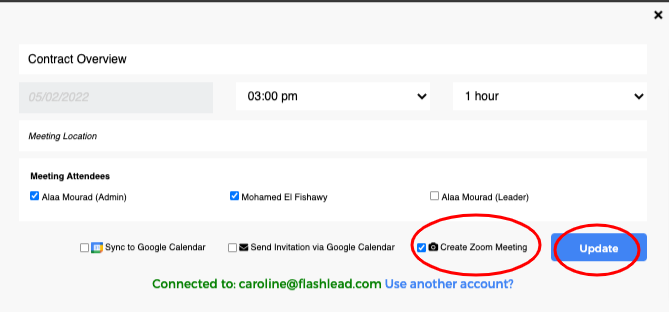
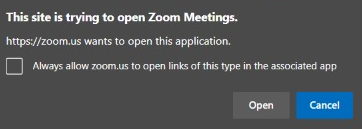
Once checked you have to log into Zoom and accept Flash Lead access to your Zoom Account.
Once the access is given, Flash Lead will create a Zoom meeting and send to the attendees
All the information regarding the Meeting subject, time, attendees and goal will be automatically added to Zoom
